Toys Regulations (SOR/2011-17)
Full Document:
- HTMLFull Document: Toys Regulations (Accessibility Buttons available) |
- XMLFull Document: Toys Regulations [131 KB] |
- PDFFull Document: Toys Regulations [2667 KB]
Regulations are current to 2026-03-17 and last amended on 2024-11-20. Previous Versions
SCHEDULE 6(subsection 32(3), section 34 and Schedules 5 and 7)Description of Apparatus
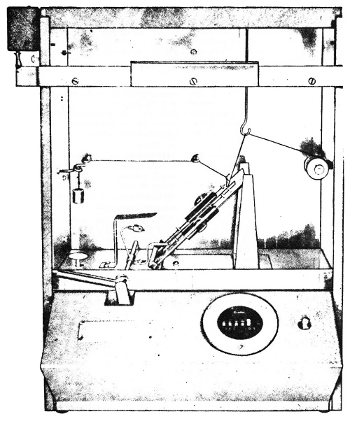
Flammability Tester
1 (1) The flammability tester illustrated in Figure 1 consists of a draft-proof ventilated metal combustion chamber that encloses a standardized ignition medium, a specimen rack and an automatic timing device.
(2) The combustion chamber prevents air circulation around the specimen rack and flame, but permits free ventilation for rapid combustion. The chamber is 368 mm (14½ inches) wide by 216 mm (8½ inches) deep by 356 mm (14 inches) high. There are 12 holes that measure 12.7 mm (½ inch) equidistant along the rear of the top closure. A ventilating strip is provided at the base of the sliding glass door in the front of the chamber.
(3) The specimen rack provides support for the frames in which the specimens are mounted. The angle of inclination of the specimen rack is 45°. Two guide pins that project downward from the centre of the base of the rack are positioned into slots that are located in the floor of the combustion chamber. This allows for the adjustment of the specimen in relation to its thickness and the flame front. The specimen rack has an indicating finger with a fore part that touches the specimen when the rack is correctly adjusted.
(4) The specimen holder consists of two 1.6 mm (1/16 inch) matched metal plates with clamps mounted along the sides of the plates. The specimen is fixed between the plates. The plates are slotted and loosely pinned for alignment. The two plates of the specimen holder cover the full length of the specimen but do not cover 38.1 mm (1½ inches) of its width. The specimen holder is supported in the combustion chamber on the rack at a 45° angle. Five specimen holders are provided.
(5) Two control knobs hold the rack in test position. The knobs can be reached under the stage of the cabinet and permit, when loosened, forward and backward movements of the rack.
(6) The ignition medium consists of a spring-motor driven gas jet formed around a 26-gauge hypodermic needle. A trigger located in the front of the flammability tester serves to wind the spring-motor when the flammability tester is ready for operation. The gas jet is protected by a copper shield.
(7) The stop cord is stretched from the spool through suitable thread guides provided on the specimen holder and chamber walls. This allows the cord to be laced in the proper position, exactly 127 mm (5 inches) from the point where the centre of the ignition flame impinges on the test specimen. Use a mercerized sewing thread No. 50 for the stop cord.
(8) A weight that is attached by means of a clip to the stop cord actuates the stop motion when it is dropped.
(9) The glass door slides in grooves at the front of the cabinet. A knob moves the catch mechanism used to hold the sliding door in an open position for insertion of the test specimen holders.
(10) A sensitive fuel control valve regulates the fuel supply at the tank. The valve ends in a ½-inch male connection for attachment to a standard No. 4 butane cylinder of 0.91 kg (2 pounds) capacity.
(11) The flow meter consists of a U-shaped glass tube that is installed into the gas line to register the gas pressure delivered to the microburner. A movable metal plate with two parallel horizontal lines properly spaced to indicate the desired gas pressure is attached to the case wall behind the flow metre. When the pressure is off, the plate is regulated so that the liquid level in both sides of the U-shaped tube meets the lower line. When the flammability tester is in operation, the pressure is adjusted so that the higher liquid level in the U-shaped tube meets the upper line.
(12) The starting lever is operated from left to right in one stroke and is released to operate the gas jet. A driving mechanism on the rear of the cabinet moves the gas jet to its most forward position. The mechanism automatically starts the stop watch by means of special attachments at the moment of flame impact. When the cord is cut, the weight drops on a platform and stops the watch. Timing is read directly.
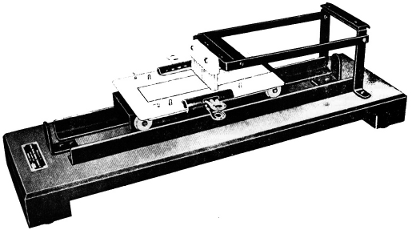
Brushing Device
2 (1) The brushing device illustrated in Figure 2 consists of a baseboard over which a small carriage is drawn on parallel tracks that are attached to the edges of the upper surface of the baseboard. The brush is hinged with pin hinges at the rear edge of the baseboard and rests vertically on the carriage with a pressure of 150 g (1/3 pound).
(2) The brush consists of two rows of stiff nylon bristles mounted with the tufts in a staggered position. The bristles are 0.41 mm (0.016 inch) in diameter and 19 mm (0.75 inch) in length. There are 20 bristles per tuft and four tufts per 25 mm (1 inch). A clamp is attached to the forward edge of the carriage to permit the specimen to be held on the carriage during the brushing operation.
(3) After the specimen has been put in place on the carriage and fastened by means of the clamp, raise the brush, push the carriage to the rear and lower the brush to the surface of the specimen. Then draw the carriage forward by hand at a constant speed.
Modified Specimen Holder
3 The modified specimen holder consists of the holder described in subsection 1(4) with the addition of 38-gauge (B & S) spring steel wire securely attached across its width at 1.27 cm (½ inch) intervals. This arrangement allows the calibrated flame to impinge at a point midway between the two lowest wires.

FIGURE 1 — FLAMMABILITY TESTER / FIGURE 1 — APPAREIL D’ESSAI D’INFLAMMABILITÉ
(Photograph courtesy of United States Testing Company, Inc., Hoboken, N.J., U.S.A.) / (Photo : United States Testing Company, Inc., Hoboken (N.J.), États-Unis d’Amérique)

FIGURE 2 — BRUSHING DEVICE / FIGURE 2 — APPAREIL DE BROSSAGE
(Photograph courtesy of United States Testing Company, Inc., Hoboken, N.J., U.S.A.) / (Photo : United States Testing Company, Inc., Hoboken (N.J.), États-Unis d’Amérique)
Page Details
- Date modified: